Adding Content
To add text and/or images to your site, click on the + content link in the content container where you want to put your new content. (Most pages will only have one content container, but for those pages that have more than one, chose the one where you want your content to appear). When you click on + Content, a select menu appears as well as a title field. The select menu contains the different types of content that can be added to a site. To add text and/or images, chose this in the select box (is the default chose), type in a title and click the submit button.
Adding Text
After you add a new “Text & Images” content block, you can edit this new block by clicking on its “edit” link. This will reveal an HTML editor where you can type text. Alternatively you can copy text from a Word document and paste it into the editor. We strongly recommend that you use the editor’s “Paste from Word” tool ![]() (i.e. click on this tool’s icon in the editor and paste into its field first, and then click its OK button).
(i.e. click on this tool’s icon in the editor and paste into its field first, and then click its OK button).
Adding Images
 Click on the editor’s image tool
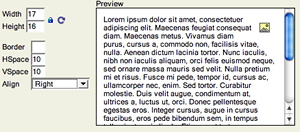
 ![]() to add images to the content block. When you clickon the image tool a window pops up. Click on the Browse Server button of that window to open the site’s Media Library. Click that window’s Browse button to browse your desktop for the image you want to upload. Chose that image, click the Upload button to add it to your Media Library and finally click the Use button to use that image in the content block. The Image Properties window allows you to define where this image aligns in relation to the text around it, as well as define hspace and vspace which determines how closely the text wraps to your image.
to add images to the content block. When you clickon the image tool a window pops up. Click on the Browse Server button of that window to open the site’s Media Library. Click that window’s Browse button to browse your desktop for the image you want to upload. Chose that image, click the Upload button to add it to your Media Library and finally click the Use button to use that image in the content block. The Image Properties window allows you to define where this image aligns in relation to the text around it, as well as define hspace and vspace which determines how closely the text wraps to your image.